post

Beet Ravioli (Casunziei all’ampezzana)

These are an attractive, dish to serve to your vegetarian friends. Garlic-infused beet and potato ravioli, topped with a simple butter and poppy seed sauce. If you want to get extra-fancy, make batches with red beets and golden beets for a multi-colored main course.

Ingredients

  • 3 1/4 cups all-purpose flour
  • pinch of salt
  • 4 eggs
  • 2 tablespoons olive oil
  • 1 1/2 pounds (700 grams) of fresh beets (about 3 medium beets)
  • 1/2 pound (250 grams) of potato (about 2 small potatoes)
  • 2 peeled garlic cloves, whole
  • Olive oil
  • pinches of freshly ground nutmeg
  • pinches of ground cloves
  • 3/4 cup butter
  • 1 tablespoon poppy seeds
  • 3 ounces (80 grams) Parmesan cheese, grated

The Pasta

Combine the flour and the pinch of salt in a bowl, make a well in the center and crack the eggs into it, add the oil, then, using a fork, whisk the egg and oil until combined. Slowly start working the flour into the eggs. The mixture will become very stiff, eventually, you’ll have to switch to your hands. Work the dough until it is no longer sticky. When it is smooth and bounces back when poked with a finger, shape it into a ball, wrap in plastic wrap and let rest for at least 30 minutes.

The Filling

While the dough rests, wash and quarter the beets and the potatoes (don’t bother peeling them). Place together in a pot, cover with cold water, add a pinch of salt and bring to a boil. Cook until tender (the potatoes may finish faster than the beets, if so, remove them with a slotted spoon and let the beets finish). Puree both the beets and potatoes using a food mill (the skins will be left behind in the mill).

Heat two tablespoons of olive oil over gentle heat in a pan large enough to hold the beets and potatoes. Add the garlic cloves and saute for a moment. Over medium-low heat, add the potatoes and beets and cook until they thicken and start to bubble, 10-15 minutes. Add the nutmeg,  cloves and some salt, remove the garlic and take the mixture off the heat, letting it cool completely.

Making the Ravioli

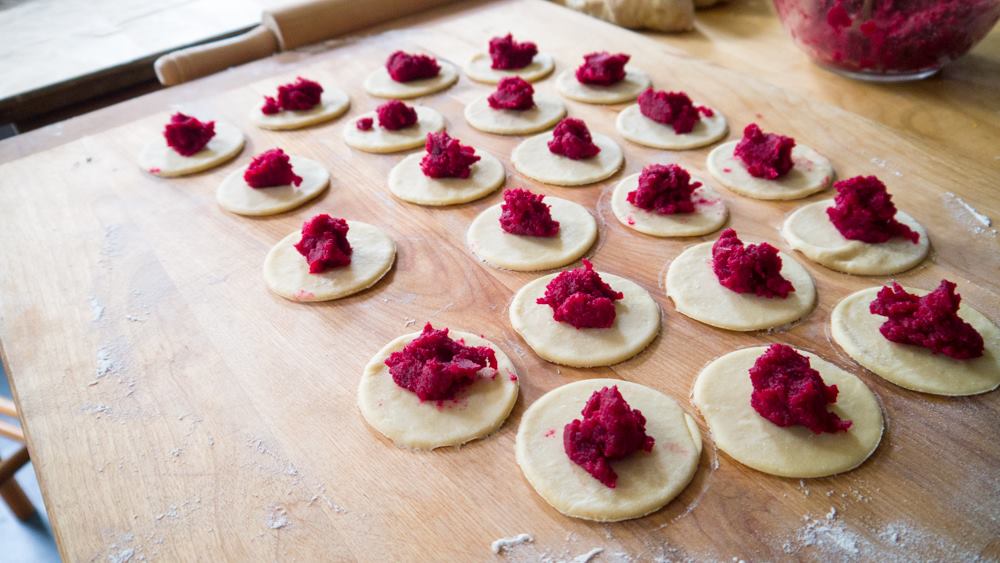
Roll out half of the pasta on a floured surface until it is thin enough to see your hand through (a pasta machine works, too, of course). Cut out rounds with a drinking glass or a 3″ diameter biscuit cutter. Place a teaspoon of filling in the middle of each round, then fold over to make half-moon shapes. Seal the edges firmly with your fingers or with a fork. Set the ravioli aside, uncovered, on a floured surface as you finish them. Save the scraps of dough under a tea towel while you work. Continue to roll and fill until the filling and dough are used up.

At this point, the ravioli can be placed on a cookie sheet, so they’re not touching, and frozen. Once frozen, bag them and return to the freezer. To cook the frozen ravioli, bring a pot of salted water to a gentle boil and place the frozen ravioli straight from the freezer into the water. Do not thaw them first.

If you are cooking them fresh, bring a pot of salted water to a gentle boil and drop the ravioli in. Remove them when they float, 2-3 minutes. Toss with melted butter, poppy seeds, and freshly-grated Parmesan (a grinding of black pepper, while non-traditional, is welcome, too). Serve immediately.

post

Texas-style Chili

I had a hankering for real, Texas-style chili: no beans, stew beef rather than ground beef, and a slew of different chiles, both dried and fresh. Your mix of peppers determines the heat; I opted for milder spiciness, if you like things hotter, add in some dried Thai bird chiles or some fresh scotch bonnet or habaneros.


2 dried red New Mexico chiles
3 dried pasilla chiles
1 chipotle in adobo
1 tbsp of adobo reserved
1 tsp cumin powder
4 lbs grass-fed beef, sliced into 3/4″ cubes
1 white onion, diced
2 fresh green chiles
2 cloves garlic, minced
1 tsp dried oregano
14 oz. can of crushed tomatoes
1/4 cup masa harina

split and seed the dried chiles, toast them on a hot, ungreased cast iron skillet, one at a time, pressing them down, flipping and pressing them down again, 10 seconds or so per pepper. Transfer to a bowl, cover with boiling water and soak for 30 minutes or so.

Transfer the peppers to a blender, add half the garlic, the cumin, the reserved adobo, a bit of salt, and enough of the soaking liquid so you can puree the peppers. Work the puree through a medium mesh strainer back into a bowl. Heat 2 tbsp oil in a skillet and add the pepper puree, cook, stirring over high-heat for 2-3 minutes, until it darkens slightly and becomes a bit glossy. Transfer back to a bowl.

In a six quart dutch oven or pot, heat another 2 tbsp of oil. brown the beef in batches. remove to a bowl. Once all the beef is browned, without wiping out the pot, add the onion and saute until translucent. Add the green chilis and the remaining garlic, cook, stirring until the pepper softens slightly. Add back in the beef, toss to coat, then add the chili sauce, tomato, and oregano, stir, bring to a boil, then reduce heat and simmer, covered, until the beef is tender, 2-3 hours. Right before serving, stir in the masa (which will thicken the sauce slightly) taste, adjust salt, if necessary, and serve with corn bread.

post

Easy Artisan Bread

This is, really, the simplest loaf of bread to bake. The only catch? You need a dutch oven that can stand being put in a 450 degree oven. Cooking the bread in a dutch oven traps the moisture, giving the crust that lovely look. This has been my weekly bread all winter. Minimal fuss with a wonderful result.

3 cups unbleached, all-purpose flour
1 tsp salt
1/2 tsp yeast
1-1/2 cups warm (110 degree) water.
Stir together the dry ingredients, add the water and stir until just combined. Cover the bowl and let the dough rise, 12-24 hours. When you’re ready to bake, preheat oven to 450 degrees. Place the dutch oven in the oven to preheat as well. Turn the dough out onto a lightly floured work surface and shape into a ball, dusting your hands with flour (the dough will be sticky. Place the dough on a sheet of parchment paper, dust the top with flour, and allow to rest while the oven heats.  When the oven is hot, remove the dutch oven, place the bread and parchment in the dutch oven, put the lid on and cook for 30 minutes.  After 30 minutes, remove the lid (I usually just remove the bread and place it on a cookie sheet) and return to the oven to brown the crust, another 15 minutes. Remove to a cooling rack and allow to cool

post

Raspberry Walnut Tart

Or, Tart Alma

I’ve got a raspberry patch in my yard. In late June, early July, and again in October, I get a gallon or two of raspberries. One of my favorite things to make is this tart. The toasted walnuts compliment the raspberries wonderfully. As an added bonus, the tart works as well with frozen raspberries as with fresh, so you can make this one in winter, as a Thanksgiving or Christmas dessert.

I call this “Tart Alma” since my friend, author Alma Alexander, flew from the west coast to Vermont solely so I could make her this tart.

Crust:

  • 1 1/2 cups (200g) flour
  • 1/2 cup powdered sugar (60g)
  • 1 1/2 sticks (3/4 cup or 12 Tbsp) butter

Filling:

  • 3/4 cup (75g) chopped walnuts
  • 10 ounces (283g) frozen or fresh raspberries (do not defrost if frozen)
  • 2 eggs
  • 3/4 cup (150g) white granulated sugar
  • 1/4 (35g) cup flour
  • 1/2 teaspoon baking powder
  • 1/2 teaspoon salt
  • 1 teaspoon vanilla

Make the crust. Preheat oven to 350 degrees. Place all of the ingredients in a food processor and pulse until a dough forms (it’ll be crumbly, but don’t bother adding any additional liquid).  Cut a round of parchment to fit in the bottom of a 10″ tart pan. Tip the crust into the pan and press it flat, evenly, over the pan. I find using a flat-bottomed glass works well, but fingers are fine. Be sure to press the crust into the edges of the pan. When the crust is flat, place it in the freezer and let it set for 30 minutes to an hour.

Take the crust out of the freezer, line it with foil, add pie weights (or dried beans, or rice) and bake at 350 for 20 minutes. Remove the weights and bake until lightly brown, another 5-10 minutes. Remove to a cooling rack.

Prep the Filling: While the pie is baking, toast the walnuts in a heavy skillet over medium-low heat, shaking frequently, until fragrant. Keep an eye on them so they don’t burn. Remove from the heat.

Beat together the eggs, sugar, flour, powder, salt, and vanilla.

Assembling the tart: Scatter the walnuts over the crust. Scatter the raspberries on top of the walnuts. Pour the egg mixture over the raspberries and nuts. Bake the tart for 40 minutes, until the top is slightly browned. The center should still jiggle just a little. Remove to a cooling rack. Take a sharp knife and work it around the edge of the tart to loosen it from the pan. This will make it easier to remove from the pan when the tart is cool (I use a two-piece tart pan, so I can lift the tart out of the pan and slide it onto a serving platter, which I recommend).

post

Cheddar Herb Biscuits

I’ve been making biscuits for years, using them to top cobblers, making them to accompany breakfast. When I the herb garden is producing, I like to make these, they’re slightly showy (if a biscuit can be called showy) and I find a savory breakfast more appealing than a sugary sweet one. These are best served warm, but reheat well. They’ll keep for a few days, not that I’ve managed to keep them around for more than a day.

Ingredients

2 cups unbleached all-purpose flour
1 tsp baking powder
1/2 tsp baking soda
1/2 tsp salt
4 tbsp. unsalted butter, cut into small cubes
1 cup grated cheddar cheese (yellow looks better than white)
1 tsp. garlic powder
1/4 cup fresh herbs, minced: Sage, thyme, chive, and parsley work best.
1-1/2 cups buttermilk (approximately)
Melted butter, for brushing

Instructions:
Preheat oven to 425
Line a baking sheet with parchment paper

In a large bowl mix together the flour, baking powder, soda, and salt. With your fingers, work in the butter until the mixture resembles cornmeal (alternatively, you can put all of the ingredients up through the butter in a food processor and pulse until combined). Add in the garlic powder, herbs, and cheese, toss lightly to combine with the butter/flour mixture. Add 1 cup of buttermilk and stir gently until a loose dough forms. If it is stiff, or there is still dry flour at the bottom of the bowl, add more buttermilk and gently stir until everything is taken up.

Turn dough out onto a floured work surface press it into a rectangle 1/2″ thick. Fold the dough over on itself once and press it out again to 3/4″ thick. Cut the biscuits into your preferred shape. The quickest cuts are square, using a bench scraper. I usually make triangles by cutting the squares in half. A juice glass or biscuit cutter will give you round biscuits. Any scraps from cutting can be pressed together into more biscuits.

Set the biscuits on the baking sheet, brush the tops with melted butter and bake 15-20 minutes, until the tops are golden and the bottoms brown. Cool for five minutes and serve.